Showing posts with label Electric Quilt 7. Show all posts

Wednesday, November 6, 2013

Sew Pretty Sew Easy Tote Bag--Great for Gifting

Sew Pretty Sew Easy Quilted Tote Bag
I wanted to design something pretty and practical and this little tote bag was the result. It's a great "scrap buster" project--each of the four fabrics required for the piecing and the lining require 1/2 yard or less. Add a bit of lace--three yards will be more than enough--and some polyester fleece and you have a finished bag in no time. It has simple square corners and two side seams that are bound for a neat finish inside and out. A hanging pocket inside is the perfect place for your phone, a pencil or other small items to keep close at hand.

The sewing is fast and easy. Polyester fleece between the two fabric layers adds just the right amount of body and requires only minimal quilting. I did a simple grid of squares in the center panel only, plus the stitching that holds the trim bands in place adds straight lines to anchor the pieced panel to the fleece and the lining. All pieces are cut across the width of the fabric so there is no bottom seam. It really couldn't get any easier to make it.

Sized at 15" tall and 13-1/2" wide, the tote is the perfect bag for book club meetings, quick errands--or even to hold a small knitting project. With Christmas coming, this is the perfect for anyone on your list who loves bags. You can make several in one sitting--and you might just have the makings for all of them in your fabric stash. I made mine in just a few hours, once I had the design finalized. While I love floral prints and lace, other fabrics will work too. Go bold with a bright modern print and eliminate the lace for an entirely different look.

Like all of my patterns, you'll find this one in my Craftsy pattern store at: http://www.craftsy.com/user/153303/pattern-store

I'm headed back to the machine to whip up some Christmas-themed mug rugs. I had such fun making the ones for Halloween, that I just had to get back to designing them. I'm getting pretty good at designing appliques in Electric Quilt--I don't do well with pen and paper, but EQ has made an "artist" out of me! Read my previous posts to see my "ghoulishly easy" Halloween mug rugs.

Hope you're having fun getting ready for Christmas--my favorite Holiday. I'm ready to start sewing gifts--after I finish a set of mug rugs!

Have fun sewing, quilting, and crafting.
Until next time,
Keep on sewing and smiling!
Barbara

Tuesday, January 10, 2012

Printing My Own Quilt Labels

I've declared 2012 the year to finish up unfinished projects and all those little things that I call my "I'll get around to its." Shortened, that's "round to-its."

One of the things on the "round to-its"  list—make labels for the quilts I made last year, based on designs I created in Electric Quilt 7. Patterns for all of them are available for purchase as PDF downloads on my website, www.joyofsewing.com.

In this post, I'll show you the quilt labels I designed and attached to quilts this week—along with photos of the quilts to which they belong. One more "round to-it" is crossed off my list!

To make the labels, I used the Microsoft Publisher program and fabric pretreated for inkjet printing. You can purchase my favorite fabric for this purpose at www.electricquilt.com. After printing each one and treating the fabric as directed to set the ink, I trimmed the excess fabric away 1/2" from the outer edge of the printed design to allow for a turn-under allowance. Then I slipstitched each label to the backing of its quilt.

There are lots of ways to make labels. I love finding a way to incorporate photos relative to the quilt design or the quilt recipient in mine. Sometimes I make an extra block and use that as the label, but that means I have to hand-write the details on the block using a permanent ink pen. Designing my own labels and printing them on fabric makes it possible to use interesting fonts, import photos, incorporate colors, and proofread the label before it goes to the printer.


Let's Be Friends…A Friendship Sampler Quilt


Let's Be Friends© is a colorful friendship quilt, featuring twelve blocks, set with sashing rectangles and multiple borders. Use it for a lap quilt or a wall hanging. Each block features a light-colored strip so that you can have friends sign the blocks like an autograph album. Use the design to create a keepsake quilt for yourself or for a special friend. Commemorate a birthday, a special occasion, or simply friendship.  Simple rotary cutting and machine piecing techniques make it easy to create the blocks for your sampler. Two of the blocks require a simple template for the signature strip. Several blocks also feature foundation-paper-pieced sections, a great technique for ensuring accuracy without making time-consuming templates before you even begin to sew! The pattern includes fully illustrated directions for each of the 12 blocks, including full-size templates for the required foundations, plus complete directions for assembling the blocks into the finished quilt. Tips for paper-piecing are also included. The pattern has everything you need to create a truly special quilt. Perfect for a block-of-the-month project, too. Organize your friends and get stitching!
Finished Size: 56 1/2" x 66 1/2"


I used a Publisher label template for this design, changed the default color scheme to match the fabrics in my quilt, and imported Electric Quilt Jpgs of three of the blocks in the quilt.


Peony Garden


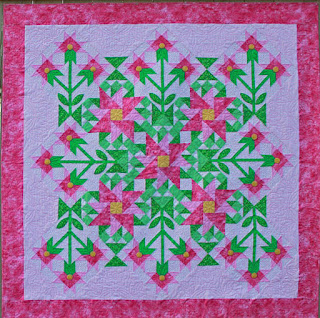
Cheerful “Peony Bouquets” surround a bed of “Peonies in Bloom” in this design to use as a lap quilt or wall hanging. Choose prints in two shades of pink for the peonies. You’ll also need a yellow print for the flower centers and three green prints in related shades for the stems and leaves. All floral pieces are set against a light background solid or print. The corners on the pieced setting triangles form a “garden fence” around the pretty bed of flowers. The “Peony Bouquet” block features appliquéd leaves and stems; directions are included for fusible as well as traditional methods.
The “Peony in Bloom” block is an adaptation of Nancy Cabot’s “Peony and Forget-Me-Nots” block. This new version eliminates corner intersections that were in the original piecing to make block assembly easier. I imported jpgs of both blocks into the label I made, using the same label template as for the "Let's Be Friends" quilt.
Finished Block Size: 12" square
Finished Quilt Size: Approximately 63" square in a diagonal setting

Hearts Entwined

This special quilt was designed as a gift for my newest grand niece, Abigail Marie Glennon. She lives in Beijing with her big brother, Han Thomas (you can read about his quilt in a previous post). She was born in late November to nephew Tom and his wife Cindy, who is from Beijing. Tom teaches Chinese children how to speak English.


For this quilt, choose two prints in coordinating values or two complementary colors. Pay careful attention to the color placement of the patches in each block and when they are joined, two large hearts entwine on the surface of your quilt. Choose prints of equal value if you want both hearts to pop, but if you want one to stand out more than the other, use prints in two values--Dark and Medium against a Light background. It's but it's pretty in pink, too, for a baby quilt, or it makes a wonderful Christmas quilt in red and green. Try two red prints against white or pink for your special Valentine.  Make it for a bride in her wedding colors--or try it in cream and tans for a wedding keepsake quilt.

Foundation paper piecing makes it easy to create accurately pieced Diamond blocks without making templates. It’s also easier to accurately piece the Small Economy Patch blocks using paper foundations. The pattern includes full-size templates to copy for the paper-piecing foundations and tips on paper-piecing.

Abby's quilt label includes the national flags of her parents' homelands, just as Tommy's quilt does, along with photos taken just after her birth. I think Tommy loves his Mai Mai (Chinese for "Little Sister").


'Tis the Season…A Holiday Wall Hanging


'Tis the Season…to decorate your home for the holidays with a pretty quilted project. You'll have this colorful wall hanging done in no time with quick-and-easy fusible appliqué and simple piecing to join the blocks and sashing and finish the quilt top. For added fun, deck the tree with an assortment of buttons, gems, sequins, and trims after you’ve completed the quilting. All appliqué patterns are given full size for easy tracing and application with your favorite lightweight fusible web. Choose assorted scraps and fat eighths from your stash for the appliqués. Finished Size: 31-1/2" x 36-3/4" 

The label for this quilt is pretty straightforward.


I made one more quilt in 2012, but it's under wraps for now. It's being quilted by my long-arm quilter and will be photographed for a catalog, due out in March. More about that one, including a photo and its label in March when it debuts.

Thursday, October 27, 2011

It's About Time!

I can't believe it's over a year since I last wrote a post. No excuses other than busy with life. Since March, I've been working exclusively on my pattern line. Since I learned to design in Electric Quilt 7, I've been playing a lot with quilt designs and have developed a few new patterns. The very latest one is 'Tis the Season...A Holiday Wall Hanging. I've done it in my favorite colors--pink and green--but think it would be wonderful in a two-color theme, too, such as shades of blue and silver.. Or for a more modern twist, try teal and coral! It's quick to make because it's all done with fusible applique. I stitched around each applique after fusing using the blanket stitch on my wonderful Bernina artista 730. I've loved using it for quiltmaking this year, but embroidery is fun, too, and it does a superb job at that!

Since I last posted, I added a shopping cart to my website (www.joyofsewing.com) so you can purchase my patterns with ease. I've updated all of my older patterns and added new ones. You'll find patterns for tote bags, quilts, and placemats. Many of them are no longer available at quilt shops but they're really wonderful (at least I think so). And almost all of them are available as PDF downloads so you don't pay shipping and you can have your copy in a matter of minutes. Technology sure makes life easier! I hope you'll visit the website and go to my online store for a look at the twenty patterns that are available there!
More to come!